Friday, September 6, 2013

upcycled bedskirt


I love, love, LOVE upcycling. It is so gratifying to turn something old and worn out into something new and pretty. I also super love the fact that it keeps things from going into a landfill for at least a little longer. I don't have a before picture, but at a recent trip to Goodwill I found a bedskirt for $1. I've been going there a lot for fabric lately. A queen size bed skirt is a good 3-4 yards of fabric (at least). Try finding prices like that at your local fabric store! :P
This fabric in particular had a good old-fashioned vibe that I originally planned on turning into a ruffly apron,
but today I stumbled up Whimsy Couture and their $4 pdf pattern sale: http://whimsycouturepatternshop.blogspot.com/2013/09/4-tiered-skirt-ebook.html
. It has sizes 0-3 months, to girls 14/16. This is actually the first PDF I've ever bought, but it was way too good a deal to pass up on, and I'm so glad I didn't!

Anyways, another perk is that I didn't have to sew a single hem because there was already one there! I still have tons of fabric left over, and for only $1, I love that my daughter not only gets a super cute skirt, but also one that I don't mind her catching bugs & playing in the mud in. :)


yep, it's twirly!

Have you ever upcycled anything before?


Sunday, September 1, 2013

$12 furniture makeover

dresser, before
My sewing things are in the kid's playroom, and I recently walked in to find my 16 month old happily sitting on top of my sewing desk throwing pins across the room. No bueno. :(

I'd been looking for an armoire desk, but was at a standstill, because we didn't want to pay what a good quality one costs, but really didn't want to spend $120 on a cheaper made one either.

Enter my happy day when I found this one at an online yardsale for $10:
this beauty is $120 at walmart 

It was so cheap for two reasons: It had been sitting in their garage for months, and it swayed wildly from side to side. Maybe you all haven't suffered from swaying cheap furniture before, but it's something that we've dealt with a lot in our family. I always thought it meant my plywood stuff was in it's death throes. One day, my wonderful husband educated me that that super flimsy cardboard that is tacked to the back is actually SUPER important. Maybe I'm an idiot, but I always thought that was just a way to finish the look off, so you didn't see wall like the desk above, so I'd just pull it off if it started coming off.  Turns out, that flimsy piece in the back is what keeps the furniture from rocking from side to side. Since learning this, new life has been breathed into all sorts of doomed furniture...dressers, bookcases, and now this desk.

Now you know.

So to start out with, I touched up the scratched paint with some black acrylic paint we had lying around. Next, I cut a piece of cardboard from a wardrobe box to cover the back, wrapped it in high quality gift paper (this one from Hobby Lobby) and the nailed it to the back with tons of tiny nails:

Next, I cut a small hole with an exacto knife for cords:


Then I painted one side of the door with chalkboard paint ($3) just following the directions on the back. Although I think I need to go back and add a third coat, since the 1st had a bit of a hard time sticking to the laminate coating.


I also bought a small roll of cork from H.L. ($4) cut it to fit the space, hot glued a piece of burlap around it, and then hot glued it to the door. I'm thinking of gluing "peals" around the edges for a more finished look.


That was it! About $12 of renovations for this final product:


No more baby playing darts with his mama's sewing needles!


Monday, August 19, 2013

Bathroom update


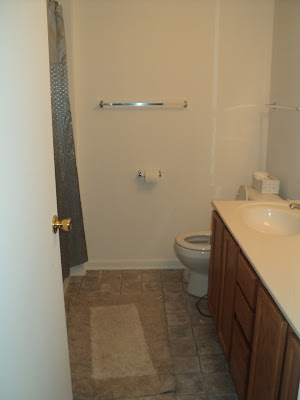
We recently made a few changes to the kids bathroom. We're renting, so painting is not an option. Our before bathroom was so bland and...blah. I'm not huge into kids themed bathrooms, and while I wanted something cute, I didn't want anything too cutsie (if that makes sense). Anyways, I've had a few people ask about the specifics, so thought I'd post it here!

Bathrooms are hard to photograph, but here's the "before"
see? Blah.

First thing I did was order a ruffled shower curtain. The first one I ever saw was this beauty from Anthropologie. Alas, $118 was way more than I could justify spending on a shower curtain for the kids. I spent a lot of time searching for one that was in our price range. I finally came across this one for only $30 including shipping.

next up was the little silhouettes. I painted some small canvas' I had black (you can see the edges a little) then cut out white scrapbook paper to size and glued it on there. Next I took pictures of my kids profiles (this was the hardest part!) the printed the pictures, cut their heads out, laid them on top of black paper, traced around, then cut them out again, and glued them. Simple!
Finally, we have a projector, so my husband  made the Eiffel Tower for me using that, cardboard, and a little spray paint. I know most people don't have a projector, so we got lucky on that one.

So there it is! $30 for the curtain, $1.50 for paper had a huge impact on this little space. Everything else we already had around the house!


Thursday, July 18, 2013

Homemade Granola

I've been big on making homemade granola lately. It's an accumulation of wanting to know exactly what's in my food, trying to eat better, and saving a little money. The thing I love most about it is that you can put pretty much anything you want in there. It's like the casserole of baked goods.


Here's my favorite so far:

4 cups Old Fashioned Oats
1 cup sunflower seeds
1 cup chopped almonds
1 cup ground flax
1 cup coconut flakes
1 cup dried cranberries

Caramel Sauce:
1 cup brown sugar
1/2 cup milk
1/4 cup butter

Melt ingredients over medium heat until well combined, stirring constantly for about 5 minutes.

**Note! Here's a good place to make it healthier and use honey instead of this caramel sauce. I have a really weird thing against honey so I go this way. (I think it stems from my childhood when I used to get sick a lot and my mom would crush my medicine and mix it in there. Gag...)

If you want to do a honey mix, it would be:
1/2 cup honey
1/4 cup brown sugar
3 tablespoons butter
Combine ingredients over medium heat

Mix all dry ingredients together in a bowl, and then mix in the caramel sauce (or honey). Grease a 9x13 pan, and gently press the mixture in there evenly.

Cook at 375* for 45 minutes stirring once in the middle.  That's it! So easy! For a more dessert bar, I've thrown in white chocolate chips & cranberries for the grownups, and mini chocolate chips for the kids. Honestly though, it's tasty enough with out that!  What's your favorite granola combo?

Oh, and here's a visual for how much it makes. ;)

Saturday, June 29, 2013

Healthy (Enough) Chocolate Muffins


There are two kinds of dessert made in this house. Good for you desserts for the kids, and butter/sugar bombs for the mister and me. These are for the kids...

Anyways, these are slightly better for you than normal, and I'd even consider these a reasonable substitute for brownies (and I love brownies). I'm a chocolate person, and these were chocolate enough for me without being too much. Their good warm, room temperature, and cold from the fridge! These little guys are awesome! You could definitely make this in the traditional banana bread way, but I love the mini-cupcakes for portion control for the kiddos.

Chocolate Banana  Muffins
3/4 cup brown sugar
2 eggs
1/3 cup applesauce (the single serve applesauce cups are 1/3 cup!)
3 mashed bananas
1 tsp vanilla extract
1 1/2 cups flour (I use half whole wheat half unbleached)
1/2 cup cocoa
1 tsp baking soda
1/2 tsp salt
1/2 cup chocolate chips
1. Heat oven to 350. Spray bottom of  muffin pan with cooking spray.
2. Beat sugar, eggs, and applesauce in large bowl at medium speed until combined. Beat in banana and vanilla at low speed. Combine flour, cocoa, baking soda and salt in a medium bowl; beat into banana mixture at low speed just until combined. Stir in chocolate chips.
3 Spoon batter into pan. Bake 15-25minutes or until toothpick comes out clean.
I love the mini cupcake pans for portion control, and recently discovered that a tablespoon fills them up perfectly!
(my 6 year old filled these!)


Tortilla Soup


This is my all time favorite soup recipe. I make it all the time, and this recipe has never failed to satisfy my belly.
So delicious and healthy (well, at least if you skip all the extras at the very end). Besides a little chopping, it's pretty easy, and makes a lot.

Ingredients:
1 lg white onion diced
2 chopped fresh jalepenos (seeded)
5 cloves garlic (minced)
2 lg carrots (diced)
2 bell peppers (diced) (I usually do 1 green, 1 red if the red ones aren't too expensive)
Olive oil 
3/4 cup flour
1 tsp. Ground Cumin
1 tsp. Chili Powder
5 (15 oz) cans of chicken broth
1 (14 oz) can crushed tomatoes
1 cup red enchilada sauce
Shredded chicken (I use about 3-4 chicken breasts, but you can use as little or as much as you like)
Optional:
1 can hominy (a white corn, found in the Mexican aisle at grocery stores) this really makes the soup stretch and adds more "bulk" to it
1 can black beans drained. My husband hates beans, so this has never made it into mine, but again, this would be a great way to feed more people!
2 celery ribs (diced) Another thing my husband hates, but I like it in there.
 
Toppings:
Tortilla chips
sour cream
Cheddar cheese (shredded)
diced avocado

Sauté onion, jalapenos, garlic, carrots, celery, and green pepper in a small amount of olive oil until tender.

 Blend flour and seasonings into sautéed vegetables until flour is well incorporated.

Add chicken broth, crushed tomatoes, enchilada sauce, hominy and chicken and let simmer for an hour
Enjoy!


Wednesday, June 26, 2013

Weight Loss Wednesdays

For this new installment, I'm linking up with Naturally Fit Sisters and doing the Weight Loss Wednesday challenge with them! I'm excited! I've never been part of an online group before, and I wasn't sure it would help, but it really has been motivating suffering getting fit with other ladies!
So! I had my third baby in April 2012 and since then I lost 45 pounds, and more recently gained 5 back.  I'd like to lose somewhere between 10-15 pounds. The problem I'm facing now is that I've lost all the weight I think I'm going to by diet change alone. I also (and mostly) just want to be in shape so that I'm not held back by what I'm too tired to do. Now I have to add in the dreaded exercise. The problem is-it's so hard. 

Even as I type, I'm debating whether or not to go all the way downstairs to get my camera to share some pictures I took. :P I think I won't and I'll let you use your imagination. Basically, it says I weigh 140.6 pounds. It's not horrible or anything, but I'm 5'3" so it's not great either.  I'm also sharing this MAJORLY cropped picture (I know no one wants to be seeing my muffin top):
These used to be my favorite pants. Clearly it's been a while since I've worn them. To fit them I have to be able to move where my finger is alllllll the way over to that button.

Anyways, if you're interested go visit Naturally Sisters. They are really awesome and so supportive. I met Big Sis while we were stationed in Texas, and even though it was short, I'm glad I did. :)